11.20.2013

Cover Girl - My Articles in PAGES Volume 4

I actually have two articles in the new PAGES, Volume 4.  I thought I would check to see if the digital was for sale yet in the Cloth Paper Scissors shop, and I found it HERE.  Much to my surprise, I am a cover girl again!  Those are my Henna Books on the cover!!!!  My other article Keeping an Idea Journal is on page 84.


I'm so excited I even teared up a little.  

The paper and digital editions are available right now, so grab one up and let me know what you think about my articles!!!!

I have not been posting much here on my mixed media blog.  I have concentrated a lot of my creative energy toward creating a line of jewelry.  You can read more about this creative venture on my Native Bloom blog.  I just did a post on soft soldering and reviewed a kit from Rings & Things, and you can see that post HERE.  Here is a picture of my first piece.  


It's reversible, here's a shot of the back.


The post links to a tutorial and a couple of really helpful videos I would recommend you watch before you even pick up your soldering iron.  I wish I had, and only found the videos after I had a problem with oxidization.  But if you have started and have problems with your soldering iron, watch the videos before you give up.  Follow the link above to my other blog to find these links.  

10.02.2013

Native Bloom Studios - New Blog, New Focus

Hi guys, I wanted to let you know I am building a new blog called Native Bloom Studios.  It is all about my new focus and goals in the art jewelry and business world.  I am going to be raising money through Kiva Zip for equipment and supplies to launch a line of memory jewelry called Heirloom by Native Bloom.  Please follow my blog if you are interested in keeping up with my progress, and if you are interested in signing up for upcoming giveaways.  I will still be documenting my mixed media adventures on this blog, but my main focus will be building my jewelry business.  Thanks!

7.16.2013

Published - Bead Trends Magazine July 2013


I dolled my Charmed Brass Book Necklaces up a bit and got them published in the Bead Trends July 2013 issue.  You won't find it in print though, Bead Trends is no longer going to be published because Northridge Publications will be putting all of its focus and energy back to scrapbooking and memory making.  This issue is only available digitally.  


If you are interested in the first charmed book featured here, I have an Etsy listing here.  The other two are not listed, but if you are interested, just email me (ispywithmycraftyeyes@live.com) or message me on Etsy. 
I also have some of these charms listed in the components section of my shop.  (2 for $6)
Thanks for having a peek at the stuff I make.   


6.21.2013

Splish Splash Bathroom Art

I have been working on this new painting (well, a cover-up of an old painting) for the last couple of days while my one-year-old whines at my feet.  Even taking regular breaks to hold him does not satisfy him, which is rather contrary to his normal laid back personality.

5.29.2013

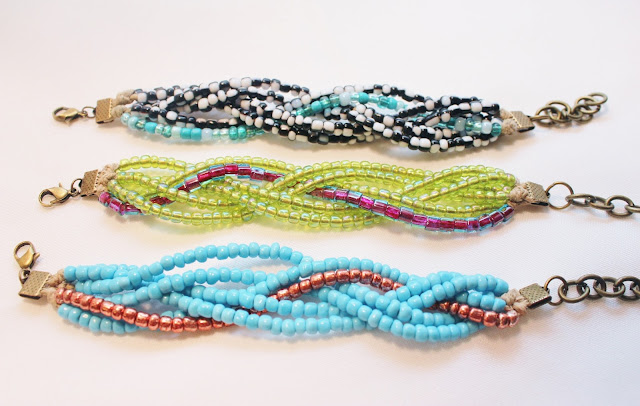
Easy Multi-Strand Braided Bracelet Tutorial

I'm now offering this tutorial for free on my jewelry blog Native Bloom.  To get to the post and the free PDF, just go HERE and follow the link to the post.


Check out this listing for more information.

5.18.2013

Article Published in Cloth Paper Scissors - Faux Lampwork Headpins


Lucky me (or blessed I should say), I finally got an article published in Cloth Paper Scissors!!!  One item on my bucket list I can check off.  I have dreamed about this for years now.  My article "Faux Lampwork Headpins" was published in the May/June 2013 issue on pages 50-54.  A four page spread, I am just so excited.  Here are a few pictures I took of these headpins before I sent them in a few months back.  I just got them back in the mail a few days ago along with my complimentary copies of the issue.


A necklace I made with the headpins. 


The headpins in a funky (and dirty) little vintage glass jar. 


I have five sets of them listed in my Etsy shop; if you are interested stop by and check them out.


5.12.2013

Sewing Desk Upcycle - Part Two


Remember the sewing desk I worked on last March?  It took me forever to figure out what I wanted to do with this desk.  I was inspired by this piece by Michelle Allen of Allen Design Studios


What I love about this is the white painting over a very colorful under painting.  So I did a very colorful under painting and left it for a while, unsure what to paint over it.  


When I started decorating my bedroom I knew I wanted to go with a night/star theme.  Up until a couple of weeks ago my sewing desk was in my dining room.  I started moving my art stuff out of there to make room for an actual dining room table and decided to make a little sewing nook in my bedroom, so I knew I wanted to paint start on the desk.  Simple stars with a lot of white, very little of the colors showing.  I drew stars in chalk and painted over them.  Here are some close ups.


I still need some cool handles.


Here's my little sewing nook, I am in love with it.  It's a lot more secluded and intimate than my former sewing space, and I am very comfortable creating here.  I even made a quick plywood chalkboard for ideas (or sweet little love notes to my hubby).


Some nice sunlight coming in during midday.  I also made a little ruffle curtain to cover my bookshelf.


So what do you think?  Could you create here?  Do you prefer wide open spaces to create in, or do you like to tuck away in a corner and make stuff?


4.29.2013

Radio Console Record Player Upcycled and Distressed


For those of you who don't know, my hubby loves records.  Until recently, this was his set up to listen to them...


Very functional, but not very attractive.  This wasn't a problem until recently when our little Gray man started to get very mobile and into everything.  What Brandon needed was a cabinet to hold all this and keep little hands from getting into his records and electronics.  

A few months ago he went into a thrift store and found an awesome radio console from the 1940s, a Magnavox Belvedere.  He kinda wanted it, but didn't buy it.  A few days later he noticed it missing from the store and asked if they sold it.  They did not, it was actually outside in the trash!  They told him they would be glad to retrieve it and let him have it free of charge, and he gladly took it off their hands.  

This console sat around in the house for quite a while.  It was dirty and not quite so attractive.  It needed shelves built in and some TLC. 


It started to get closer to Brandon's birthday and I had no idea what I would to for him since I do not work and usually bum from him if I need something.  With no money for a gift I had to figure something out!  Then he started to obsess about this, and I knew getting onto this project would be the perfect gift.  He asked my stepdad how to add shelves to the unit, and I measured everything out.  We went to Lowe's and purchased some 1/2 plywood and had it cut to size.  We also got some decorative aluminum sheet.  We had all the paint we needed.  

I built the shelves in (hubby is very good with music and spiritual matters, but not much of a handy man) and he sanded and primed the console.


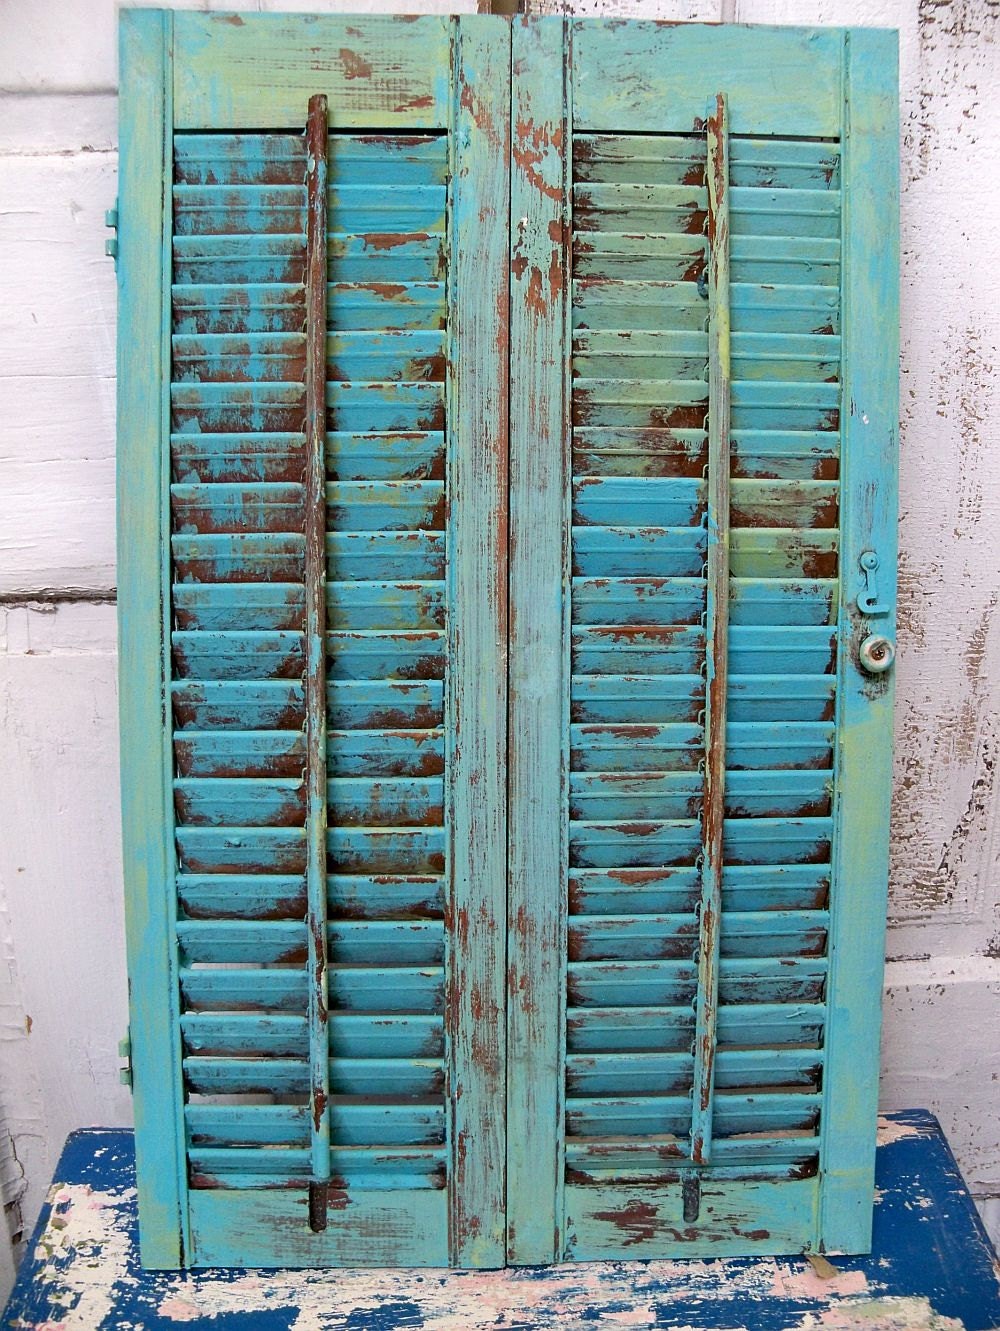
Brandon knew he wanted something distressed.  It took him a couple of days and he found the perfect image. He sent me a link to this image and said this is how he wanted the console to look when painted.  It is a vintage distressed shutter by Anita Spero of Anita Spero Design.  She does excellent distress painting (and has some lovely angel wings in her shop that I would LOVE to have).  With an image in mind, I knew what to do.  


This was perfect because we had a can of latex paint already in a very similar turquoise/aqua color.  I painted the base color and thought I would just stop there until the next day, but I ended up getting very obsessed and stayed up all night painting this sucker.  

Here's the base coat (it's the same color of the end table his record player was on before).


After the base coat dried, I added a few strokes of a golden yellow paint mix (yellow latex paint, golden acrylic paint, and Pledge Floor Finish).  I just brushed it on and smeared it around with a cotton rag. Then I sanded several areas down to the wood.  I noticed a lot of primer showing and the wood looked new, so I rubbed a paint mix over them (brown, black, and burnt umber acrylic paint mixed with Pledge Floor Finish). I just used a baby wipe to apply the mix.  I dipped it in the mix and just rubbed it in until I like the look of it, and wiped the excess off with a cotton rag. 


Detail of the distressing...


When I got the painting done, I added some cloverleaf decorative aluminum sheet, cut to size, where the speakers used to be. 


We decided to prime everything with Pledge Floor Finish to avoid all the fumes from polyurethane.  It's not like it will be noticeable if the paint gets a little chipped.  

Here's the finished console.


And here it is in it's new habitat.  Hubs is very happy with it, and it keeps little baby hands out of everything.  Now we just need to get some matching knobs for it.


4.16.2013

I Will Exalt Thee Ink Version Finished


I've been working pretty hard on this doodle, I Will Exalt Thee (ink version) and just finished it last night.  Check out my original doodle here to see the humble origins of this drawing.  This is the first in a series I am calling "Art as Worship."  If you like this doodle and want to print it out for yourself, click the image below for a link to download a PDF copy for printing.   


I'll be working on a watercolor version of this next.  

3.20.2013

On My Table


This is how my work table looked last night.  I ordered some lovely things from Amazon and received part of my order yesterday, so they are on my desk along with my current WIP.

Here's a breakdown for you:


My first gouache set.  I haven't had enough time with these yet, but I do love them so far.  I wish I had the 20 color set.  

2.  Sweet tea.  Always by my side.  

3.  Messy water cup.  I like using glass jars for my water; they look so pretty and messy with streaks of color running down the side.

4.  An upcycle project for my daughter's room.  She is such a princess.  The bright beautiful colors are Dye-Na-Flow colors (yes they are made for fabric, but work well on many surfaces). 

5.  Palette - Master's Touch Plastic Folding Palette.  Filled with Koi watercolors.

6.  Brush - Master's Touch 20/0 Liner from the 5 piece white taklon set.  One day I might invest in some higher quality brushes, like maybe when I learn not to leave them soaking in water all night long.

7.  Remote control for the TV/cable.  Tuesday night is Face Off night, and I own the remote at 8 PM!!!

8.  My sorry excuse for a phone.  One day I might get a better one.  I dropped the two decent ones I had and ruined the speakers on both.  

9.  My new Koi Tube Watercolors.  I got the 18 tube set.  I am in love with these and I just got them yesterday.  I had the 24 pan field sketch box, but found it frustrating to activate the colors in those little pans.  And since I never go out to sketch I gave those to my daughter and ordered the tubes.

10.  Stephanie Corfee's Creative Doodling & Beyond.  I ordered this with my Koi watercolors.  If you like to doodle and seek inspiration, I would definitely recommend this book.  I love Stephanie's art (see more if it here) so I had to get a copy of this.  I got it last night and after about 10 flip-throughs and reading 1/3 of this I can see already that I will really enjoy the projects in this book and will keep it around for inspiration for years to come.  I love it!!!


3.04.2013

Around My Studio


Working on some prints from my lino cuts.  I may do a show soon.  It's hard to get enough stock made to do a show when I have two little ones under my feet for most of the day.  But maybe......

Here are the prints.  I laid both of my linos out on a towel and printed them at the same time.


 Here they are cut and ready to package.


2.04.2013

For You!! Free Sugar Skull and Sparrows PDF file


I learned today how to add PDFs to my blog, so I thought I would share this one with you.  Feel free to print it out for your own personal use (please do not sell prints).  Hope you enjoy, and let me know if you like this kind of thing and wish to see more.  Just click on the image for a link to the PDF file.

2.02.2013

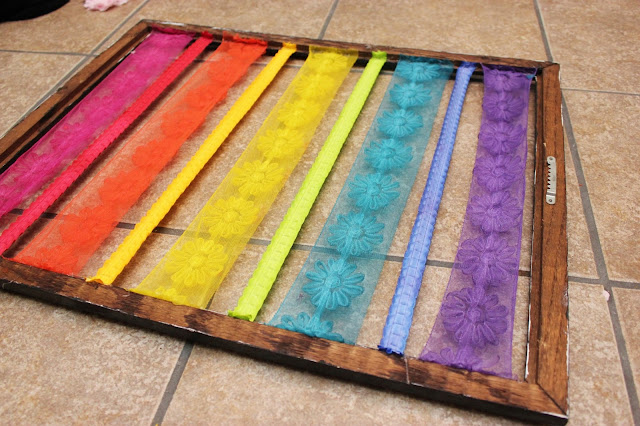
Rainbow Hair Bow Holder Tutorial


Rainbow Hair Bow Holder Tutorial

I am going all out in my daughter's room with DIY decorations that are budget friendly and very colorful.  Like rainbow colorful!  I have a quilt in the works, a tutu bed skirt, and a lovely painting planned.  I thought I would work on a project that I could finish in a day to make up for all the projects that are laying around waiting to be finished.  I get frustrated and like to see results.  I colored these ribbons, so you may wish to omit that step.  I wanted to make sure they would match her quilt perfectly, and I love dying stuff!

To make this Rainbow Hair Bow Holder, you will need the following materials:

White ribbon if you wish to color your own.  If not, ribbon in any color(s) you wish. I used ribbon with lots of texture.


A thrift store frame.  Just the frame, no glass or backing.


Dye-Na-Flow Exciter Pack and wax paper (optional).  You will not need this is you are buying colored ribbon.  I use Dye-Na-Flow because it allows me to apply bold color to whatever fabric I choose, unlike tie dye which only works well on natural materials.  Also, Dye-Na-Flow is not actually a dye but a liquid textile paint that simulates dye. 


You will also need:
Sandpaper
Gesso
Acrylic paint
Paintbrushed
Glitter (optional)
A sealer for your frame (I like to use Pledge Floor Care because it has no fumes and is a clear acrylic)
A low heat hot glue gun and glue sticks
New hardware if needed for hanging the frame


Step One:  Prep your ribbon.  Cut your ribbon to the length or width of the frame (depending on which way you want the ribbon to run) plus about 2 or 3 inches to work with.  If you are coloring your own ribbon, go ahead and apply the paint now.  I use a bowl when applying the Dye-Na-Flow so I don't make a mess, and so I don't waste a bunch of paint.


When you are finished coloring the ribbon, lay it out on wax paper until it is dry.


Dye-Na-Flow needs to be heat set, so once it dries put it in the drier for about 10 minutes on medium heat.


Step Two: Prep your frame.  Make sure you remove all the staples and unwanted hardware from your frame, then give it a light sanding to give your surface tooth for the paint to adhere to.  Gesso the frame (this is important - priming the frame will help your paint stay on the surface.


Step Three:  Paint your frame and add glitter if you wish.  I painted my frame with black acrylic paint a bit at a time.  I added glitter to the wet paint as I went along so I didn't have to glue it on.


Step Four:  Apply Your Ribbons.  Plug up your glue gun.  While you are waiting for it to heat up flip your frame over and align your ribbon.


Glue all the ribbon down on one side.  You may wish to use a tool like a knife or bone folder to press your ribbon against the frame because the glue can leak through the ribbon to your fingers.  I like using my hands so I make sure to use a low heat glue gun.


Straighten your ribbon back out and glue the other side down.


Now you can trim the excess ribbon off and hang your frame!


Lula's hair bow holder hanging in her room.  She approves.


And here it is with some of her bows on it.  By the time I get all the bows up you probably won't even be able to see all the hard work I put into it.  Oh well!!!