Showing posts with label upcycle. Show all posts

5.12.2013

Sewing Desk Upcycle - Part Two


Remember the sewing desk I worked on last March?  It took me forever to figure out what I wanted to do with this desk.  I was inspired by this piece by Michelle Allen of Allen Design Studios


What I love about this is the white painting over a very colorful under painting.  So I did a very colorful under painting and left it for a while, unsure what to paint over it.  


When I started decorating my bedroom I knew I wanted to go with a night/star theme.  Up until a couple of weeks ago my sewing desk was in my dining room.  I started moving my art stuff out of there to make room for an actual dining room table and decided to make a little sewing nook in my bedroom, so I knew I wanted to paint start on the desk.  Simple stars with a lot of white, very little of the colors showing.  I drew stars in chalk and painted over them.  Here are some close ups.


I still need some cool handles.


Here's my little sewing nook, I am in love with it.  It's a lot more secluded and intimate than my former sewing space, and I am very comfortable creating here.  I even made a quick plywood chalkboard for ideas (or sweet little love notes to my hubby).


Some nice sunlight coming in during midday.  I also made a little ruffle curtain to cover my bookshelf.


So what do you think?  Could you create here?  Do you prefer wide open spaces to create in, or do you like to tuck away in a corner and make stuff?


4.29.2013

Radio Console Record Player Upcycled and Distressed


For those of you who don't know, my hubby loves records.  Until recently, this was his set up to listen to them...


Very functional, but not very attractive.  This wasn't a problem until recently when our little Gray man started to get very mobile and into everything.  What Brandon needed was a cabinet to hold all this and keep little hands from getting into his records and electronics.  

A few months ago he went into a thrift store and found an awesome radio console from the 1940s, a Magnavox Belvedere.  He kinda wanted it, but didn't buy it.  A few days later he noticed it missing from the store and asked if they sold it.  They did not, it was actually outside in the trash!  They told him they would be glad to retrieve it and let him have it free of charge, and he gladly took it off their hands.  

This console sat around in the house for quite a while.  It was dirty and not quite so attractive.  It needed shelves built in and some TLC. 


It started to get closer to Brandon's birthday and I had no idea what I would to for him since I do not work and usually bum from him if I need something.  With no money for a gift I had to figure something out!  Then he started to obsess about this, and I knew getting onto this project would be the perfect gift.  He asked my stepdad how to add shelves to the unit, and I measured everything out.  We went to Lowe's and purchased some 1/2 plywood and had it cut to size.  We also got some decorative aluminum sheet.  We had all the paint we needed.  

I built the shelves in (hubby is very good with music and spiritual matters, but not much of a handy man) and he sanded and primed the console.


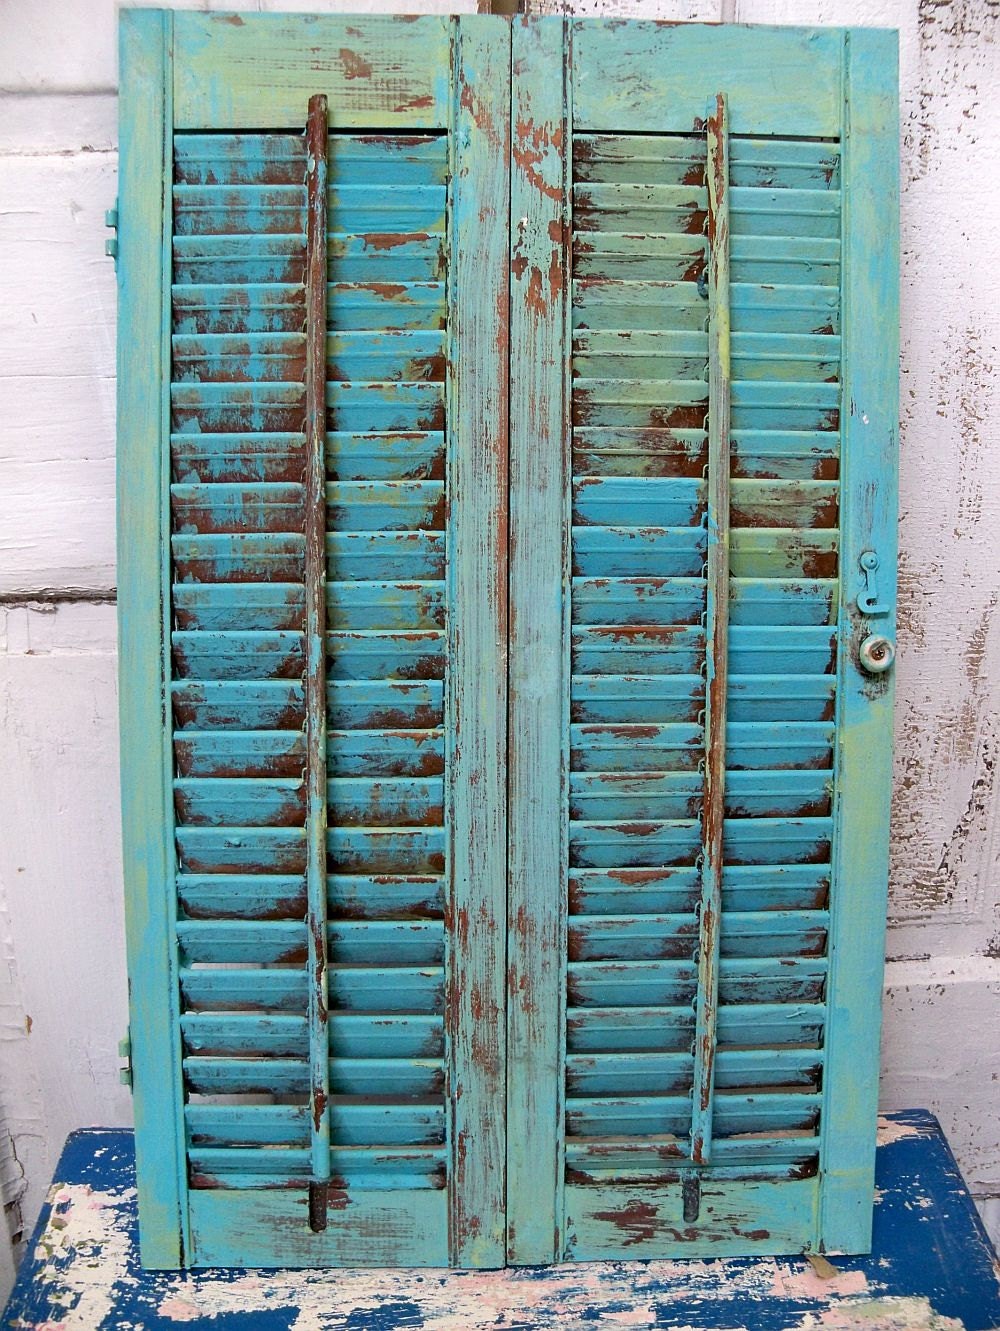
Brandon knew he wanted something distressed.  It took him a couple of days and he found the perfect image. He sent me a link to this image and said this is how he wanted the console to look when painted.  It is a vintage distressed shutter by Anita Spero of Anita Spero Design.  She does excellent distress painting (and has some lovely angel wings in her shop that I would LOVE to have).  With an image in mind, I knew what to do.  


This was perfect because we had a can of latex paint already in a very similar turquoise/aqua color.  I painted the base color and thought I would just stop there until the next day, but I ended up getting very obsessed and stayed up all night painting this sucker.  

Here's the base coat (it's the same color of the end table his record player was on before).


After the base coat dried, I added a few strokes of a golden yellow paint mix (yellow latex paint, golden acrylic paint, and Pledge Floor Finish).  I just brushed it on and smeared it around with a cotton rag. Then I sanded several areas down to the wood.  I noticed a lot of primer showing and the wood looked new, so I rubbed a paint mix over them (brown, black, and burnt umber acrylic paint mixed with Pledge Floor Finish). I just used a baby wipe to apply the mix.  I dipped it in the mix and just rubbed it in until I like the look of it, and wiped the excess off with a cotton rag. 


Detail of the distressing...


When I got the painting done, I added some cloverleaf decorative aluminum sheet, cut to size, where the speakers used to be. 


We decided to prime everything with Pledge Floor Finish to avoid all the fumes from polyurethane.  It's not like it will be noticeable if the paint gets a little chipped.  

Here's the finished console.


And here it is in it's new habitat.  Hubs is very happy with it, and it keeps little baby hands out of everything.  Now we just need to get some matching knobs for it.


12.02.2012

Tonight, Tonight


I promise I am still here, and I am still crafting.  Still taking pictures and making jewelry.  Just not making much time for blogging.  I know, no fun, right?  I just can't seem to find the focus to write.  

Here is a piece I have been working on for our bedroom.  I love The Smashing Pumpkins, and "Tonight, Tonight" is one of my favorite songs they have done.  I thought it would work well above our bed.  


I started with the picture above, which is a piece of old decor from a Subway store.  My mom had it in her yard and I asked for it.  It is huge and I thought it would be fun to paint over.  I took the frame off and put a coat of gesso over the picture  (which is two sheets of plastic with foam in the middle) and added texture with Liquitex Basics modeling paste.   Since I am not selling the piece I just used Apple Barrel and Fold Art fabric paints.  I printed the words out and projected them up with my Art Tracer Jr Projector and penciled them in.  

Here's the finished painting.  I am quite happy with it, and can't wait to get it up on the wall.  First I need to paint some shutters that I will used as a headboard.  


Hubby picked the font out.  I really like it!


7.26.2012

New Displays WIP

I'm working on some new displays for my jewelry.  I have these great large industrial bobbins and thought of a way to put these together to display my jewelry on.


My awesome bobbins!  A score at $1.99 each.

8mm reels.  Had to get rid of the severely corroded film.  Not a very good smell!

A few supplies for the makeover.

The general idea.

Now I just have to get these guys painted, drill a couple more holes, and assemble.  I'll post them when they are complete.

3.26.2012

Display Case Upcycle


I have been working on my art room lately, trying to figure out a way to decorate it on a very small budget.  I've had an old wooden display case around the house for quite some time and it has served several different purposes.  The glass was broken out of it, and I thought for a while I might replace it, but had no idea how to go about taking it apart to measure and install the glass.


It has mainly been used as a tray or shallow box.  So I got it out a few days ago to store some works in progress and realized that it should be just wide enough to fit license plates into.  I figured out how to take it apart and tested my theory.  I was right, the plates slid right into the grooves that held the old glass - it took 3 1/3 plates to fill the space where the glass had been (I cut the 4th down with tin snips). 


When I got everything figured out I went straight to work.  First I spray painted the license plates white, let them dry, and secured them into the grooves with E6000.


You can see the inside of the case here.  It is not very deep, but will work perfectly for what I now have in mind (thanks to a suggestion from my hubby).


After the glue was dry and aired out, I brought it into the house and coated the plates with gesso.   When the gesso dried, I painted the plates with a bright green acrylic paint.  Hubby really liked it at this point, but it still needed something.


I tried painting one of my own patterns over the green in an aqua color, but the pattern was too small and messy for my taste.  So I stopped midway and painted over it again with green.  I searched online for a pattern to use, and ended up purchasing a stock image to use by Laurelie on Crestock.  You can find the original image here.  I really like this pattern.  I printed it out, projected it onto the plates with my Art Tracer Projector (by Artograph, Inc), and traced the image onto the plates.  When I had it traced I went over it with a darker pencil to make sure I did not get any of my lines mixed up.


I then mixed a little bit of bright blue paint into my aqua paint and started painting.


I finished the painting last night.  I just put a clear coat on top of it, and it is sitting on my counter drying.  When it is dry I plan on adding some hooks inside to store finished jewelry and supplies.  I will then mount it on one of the walls in my art room.  That will probably be a few days from now since I need to repaint my walls before installing this on the wall.  I will post some pictures of it when I am done.


Until then, let me know what you think about this project.  And if you are in the mood for more painted license plates, be sure to check out Shelly Massey's blog, A Wee Bit Warped.  She does the cooloest art on old license plates, and my project was very much inspired by her.  I know I would not have thought to use license plates, much less paint on them, if I had not been poking around her blog for the last couple of months.

12.27.2011

Upcycled Frames - New Bathroom Art

I have been trying to add some color to my house, something I can change out if I get bored with it.  I am not quite ready to go with bright colors on the walls, so I figured colorful art and frames would be the way to go.  I wanted to start in the bathroom and was trying to think of something cool that hubby would like on the walls when it hit me - Outkast.  Oh yeah.  So I went to work.  The first frame I bought did not work out well.  It was thin and I had painted it black.  So I trashed it in search of a wider more colorful frame.  And when I saw this little beauty at the thrift store I just knew it would work.


I know, it looks kinda boring and gross.  But give it a chance.  I got my brush out and went to work.  One thing that I did not do that I really should have is sand it down a bit and prime it with gesso.  Don't skip this step!!!!  I just took the art out and went straight to painting my base coat, Folk Art Aqua.


Had to pull up the nails to get the panel out. 


I did two coats of the aqua paint and let it dry overnight.


Then I came back and antiqued it with some thinned down black paint (used water to thin it).  I just painted the black paint mix down and wiped the excess off.  And here is where I had problems.  Because I did not sand and prime my frame some of the paint peeled off.  Not a big deal, I just went back and touched it up with the aqua paint.  I had to do that in a few different places anyway because the black was too much.  I let that coat dry for a couple of hours and then coated the frame with a spray acrylic gloss (which is kinda nasty and should be used outside or with a respirator - or both!).  I sprayed one coat, let it dry 15 minutes, then sprayed another coat.  I let it sit outside for a few hours before bringing it in. 

When I brought the frame inside I put my print in and placed the panel behind it, then bent my nails back in place.  It looked good on my wall, but I thought it would look better with another piece next to it.  So I took a small plastic frame I had, painted it, and made a print of a photo I took to place inside.


I love this little frame, and thought it would look great with a nice coat of red.  Since I was out of red spray paint, and I am trying not to use it right now (baby bump and all), I just used red acrylic on this one too.  Normally I would use Krylon spray paint on something like this.  I didn't prime this one or even gloss coat it.  Just two coats of Folk Art Lipstick Red acrylic paint and I was done. 


I let it dry overnight and then placed my photo inside and hung it up with my other masterpiece.  They are in my bathroom right now.  Here is a pic of them on the wall together.  Once I get some more art and decor in the bathroom I will show you a wider view of the room.  But for now this should do.


I would like to warn you....if you come to my house and know this song you may want to close your eyes when you enter my bathroom.  Hubby and I both come out of the bathroom with this song in our heads EVERY time.  Usually we sing it or whistle it for a few minutes before we even realize what we are doing.  I may change this up before too long, but for now i think it is just too cool to take down.