Showing posts with label i spy with my crafty eyes. Show all posts

8.19.2014

New Handmade Stencils

I got super productive today and made some more handmade stencils.  I really like how these turned out.  My last few were a bit too small.  I've taken pictures of them on white copy paper with the extra pieces I will use as masks.  

Here are some stars.


Some messy chevrons.  Very messy!


A little bunting like design with flowers.  


A little half flower (looks like a whole one with the mask beside it).  I think this is my favorite.


A little fence.  


And a little piece of stone wall.


You can see more about how I make these in this blog post.  I made some last week to use with modeling paste for a challenge.

8.14.2014

Art Nest - Progress


These were all pulled from Instagram, and were taken on my phone, so the photos are not very good.  But I thought you guys might like to see some of the progress I have made in my building.  If you didn't see the before, check it out here.  It's come a long way!  Above is my space with furniture moved in, before I brought all my supplies in to sort them.

Here's a shot of one of the peg boards I put up.  I don't have sheet rock, and the panels are very thin, so I didn't have anything to hang paintings on.  I went to Lowe's and bought two pegboards, had them trimmed down, and painted them white.  Now I can rotate my art out and hang some of my tools too.


My hoots!  They have moved since this picture.


My table with nothing on it.  I prefer it this way, lots of room to work.  It's junked up at the moment.


I actually moved this cool dress form out and put it back in my house.  It is awesome, but I really don't have the space for it in my tiny little nest.


Bring in the junk!  I brought a lot of supplies and tools and stuff in to sort.  Boy I sure did have a mess for about a week in there!!!


I had another pegboard and put it up here so I could hang this cool display case.  I'll probably store some finished pieces in here.  


Stuff on my desk.  I thought I would like having things on my desk, but I really don't.  Now I have to figure out where I will put all of this.


Storage containers dressed up a bit and labeled.  I really like how they turned out!


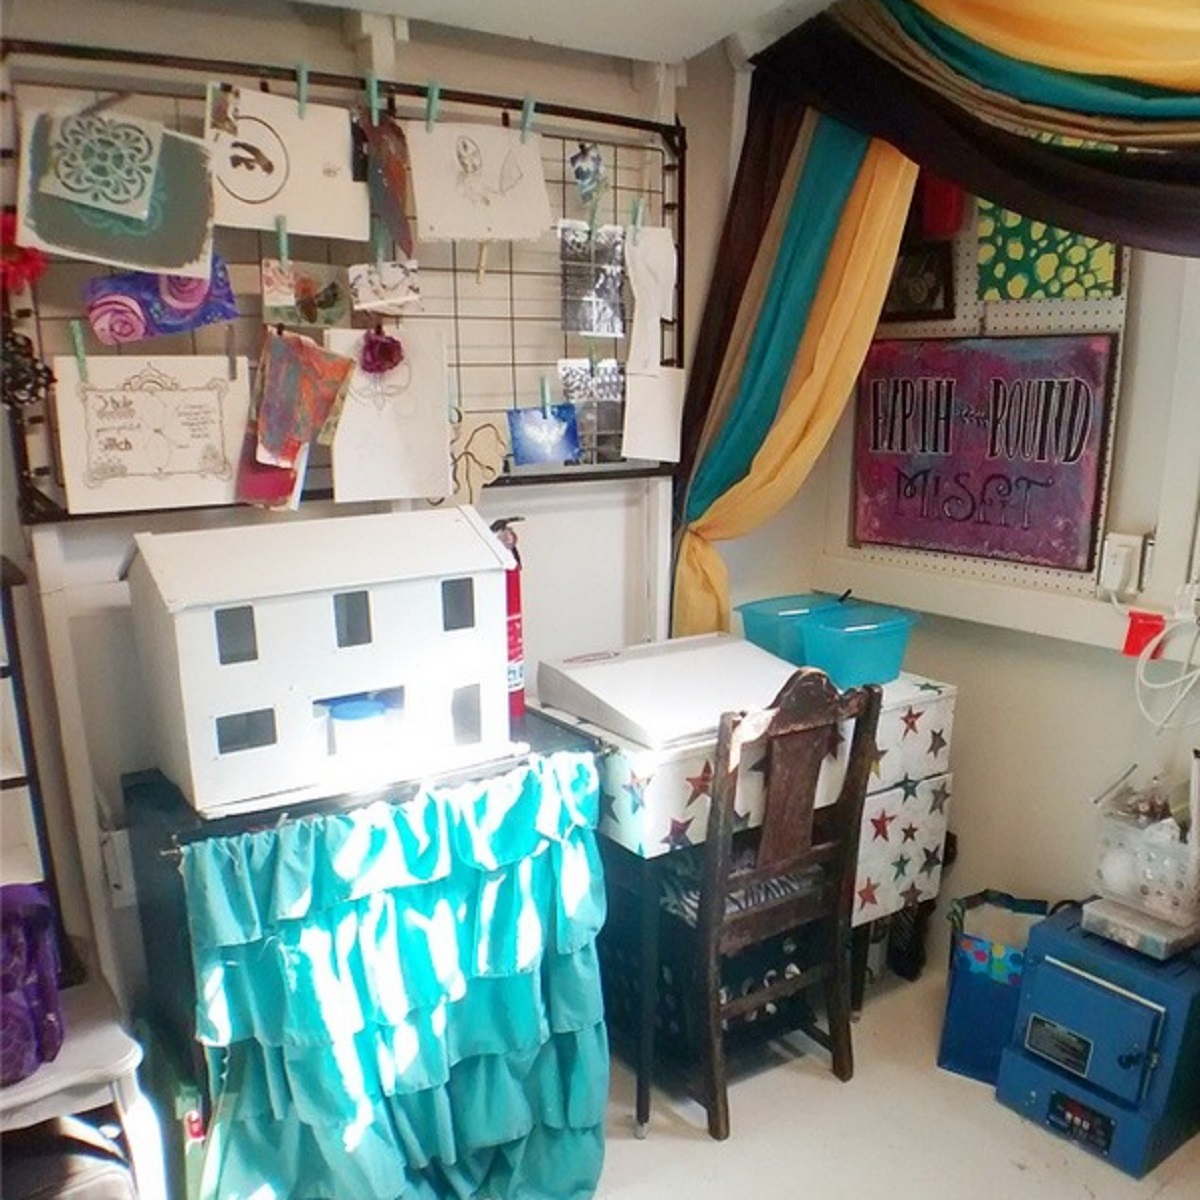
I like this little corner!  There's not much room in here, so getting a good picture is kinda tough.


This corner needs work!  I'll be taking out that little table to the far left, moving everything over, and putting in a roll cart to hold my kiln and the items on my desk.  I'm in the process of painting that dollhouse.  It was mine when I was a little girl, but it got very rusted and scratched up and needed to be repainted.  Not sure what I will do with it yet.


Here's my kiln on it's temporary table.  I love being able to use this any time I want!


Thanks for taking a little peek into my artsy world!  If you want to keep an eye on updates between posts, follow me on Instagram.  Later!

7.31.2014

Art Journal Pages - For the World


I worked on a couple of journal pages tonight, and I am pretty pleased with how they turned out.  I started out with the page above and added some more color to it.


I think I would like to try and recreate this on a large canvas.  I love working on my abstract and non-representational art in this journal.  It gives me a chance to play without the pressure of creating on a canvas.  


I wanted to do some lettering on the other page, so I started by painting the whole page with white paint.  I picked a gelli print that I thought matched my other piece well.  


I worked pretty hard on the computer to get the font just right, and ended up using Alpha Echo.  Then I ran out of colored ink, and my darn printer would not print, even in black and white!!!  So I used a piece of printer paper, placed it on the computer screen, and traced the letters onto the paper using a pencil.


I placed the paper over the gelli print and cut through both pieces.  I love my little pink X Acto knife, it is easy to control.


Part of my letters cut out.


I fixed these to the paper using matte medium.  I went over the top of them when I was done to make sure they would stay down.


All done, but I think they need some doodles too.


Oh yeah, they totally needed doodles. All done!  If you are wondering, one of the mottos we use in our church is "In God, with others, for the world" and I like it a lot.  I'm practicing right now for some larger pieces I intend to make to auction off for some of the mission work our church is involved in.  


6.04.2014

My Art Nest in Progress


Well, here she sits in my yard., all 8x8' of her.  At last!  I have been waiting for this for two months now, and finally this is mine!  You might be able to tell from the pictures that she is facing the back of my yard.  This was just by happenstance.  The person who moved my art nest went in behind it to pick it up, so she was put in my yard backward.  It is a lucky accident though, because this allows the door of my building to be in the shade most of the day.  This means less heat will build up inside.  I do have a window a/c unit in case the temperature climbs anyway.  Please forgive the quality of some of these pictures, they were taken mainly with my smart phone.


This is what you see from the side of my house, and I think this will be perfect to plant shrubs around and easy to make pretty.  Hubs and our friend/cousin David put some shutters up for me.  They also jacked the building up and straightened and leveled it.


Just peeking inside it really doesn't look like much.  But this gal has been making art and jewelry on her dining room table and storing art supplies in the laundry room under piles of clothes.  So this is a beautiful site to me.


Here she is all bare and beautiful.  I had to take these two built in tables out, and I decided to paint the inside white.  Check this post out to see my inspiration.  I don't have a sprayer and a large roller won't work, so I have been painting this with a small roller and a wide brush.


Here's the progress after a few hours.  I love how bright the white makes the room look.  


Oh that pesky ceiling!!!!!!


And here is one corner with two coats of paint covering it.  Lovely!!!!!  I can't wait to get all this done, get my floor painted, and move my furniture in!!!!   BTW, I also have a light and 16 (wow!) outlets in this building, so I should be good to go with my equipment.  Nice to know I won't have to move everything around to plug stuff in.  


3.04.2013

Around My Studio


Working on some prints from my lino cuts.  I may do a show soon.  It's hard to get enough stock made to do a show when I have two little ones under my feet for most of the day.  But maybe......

Here are the prints.  I laid both of my linos out on a towel and printed them at the same time.


 Here they are cut and ready to package.


6.29.2012

Published in Cloth Paper Scissors PAGES 2012


Last year when the premiere issue of Cloth Paper Scissors PAGES I was thrilled to find out my mini books would be included in the publication.  I have come a bit further this year with a full length article featuring my paintbrush books featured in the 2012 edition of PAGES.  I can't tell you how excited I am!  This has been a goal of mine for a few years now, something I have been working hard toward.  I received my copies of the magazine from the Interweave staff a few weeks ago and seeing my work in print is a dream come true.  I hope you guys will check this out, PAGES is a wonderful magazine and I am so blessed to be part of it.


Go here for more details or to check out the table of contents.

1.16.2012

Eye Mandala - Work in Progress

I am working on a new illustration for my I Spy Jewelry shop.  It will be printed on my packaging some time in the near future.  I am in desperate need of new packaging, and I thought I would make something special that I can use for a while. 

Here is a detail shot of the pencil work.


And a picture of the drawing in progress on my Light Tracer II.


A picture of the pencil work done.


And one of my rough draft (in two pieces) on top of the finished pencil drawing.


It takes me a few hours to get my mandalas to this point.  And I still have hours of inking left to do.  Can't wait to get my Rapidograph pens out and get started.  

12.27.2011

Upcycled Frames - New Bathroom Art

I have been trying to add some color to my house, something I can change out if I get bored with it.  I am not quite ready to go with bright colors on the walls, so I figured colorful art and frames would be the way to go.  I wanted to start in the bathroom and was trying to think of something cool that hubby would like on the walls when it hit me - Outkast.  Oh yeah.  So I went to work.  The first frame I bought did not work out well.  It was thin and I had painted it black.  So I trashed it in search of a wider more colorful frame.  And when I saw this little beauty at the thrift store I just knew it would work.


I know, it looks kinda boring and gross.  But give it a chance.  I got my brush out and went to work.  One thing that I did not do that I really should have is sand it down a bit and prime it with gesso.  Don't skip this step!!!!  I just took the art out and went straight to painting my base coat, Folk Art Aqua.


Had to pull up the nails to get the panel out. 


I did two coats of the aqua paint and let it dry overnight.


Then I came back and antiqued it with some thinned down black paint (used water to thin it).  I just painted the black paint mix down and wiped the excess off.  And here is where I had problems.  Because I did not sand and prime my frame some of the paint peeled off.  Not a big deal, I just went back and touched it up with the aqua paint.  I had to do that in a few different places anyway because the black was too much.  I let that coat dry for a couple of hours and then coated the frame with a spray acrylic gloss (which is kinda nasty and should be used outside or with a respirator - or both!).  I sprayed one coat, let it dry 15 minutes, then sprayed another coat.  I let it sit outside for a few hours before bringing it in. 

When I brought the frame inside I put my print in and placed the panel behind it, then bent my nails back in place.  It looked good on my wall, but I thought it would look better with another piece next to it.  So I took a small plastic frame I had, painted it, and made a print of a photo I took to place inside.


I love this little frame, and thought it would look great with a nice coat of red.  Since I was out of red spray paint, and I am trying not to use it right now (baby bump and all), I just used red acrylic on this one too.  Normally I would use Krylon spray paint on something like this.  I didn't prime this one or even gloss coat it.  Just two coats of Folk Art Lipstick Red acrylic paint and I was done. 


I let it dry overnight and then placed my photo inside and hung it up with my other masterpiece.  They are in my bathroom right now.  Here is a pic of them on the wall together.  Once I get some more art and decor in the bathroom I will show you a wider view of the room.  But for now this should do.


I would like to warn you....if you come to my house and know this song you may want to close your eyes when you enter my bathroom.  Hubby and I both come out of the bathroom with this song in our heads EVERY time.  Usually we sing it or whistle it for a few minutes before we even realize what we are doing.  I may change this up before too long, but for now i think it is just too cool to take down.